For the final blog post in our efficiency mini-series, we’ve decided to bring you a step by step guide to setting up and using our recommended social media scheduler.
If you’ve been following the series, you’ll know that last week we discussed using a social media scheduler and why you should (clue: yes, time-saving was a major factor!)
Leading on from this, we wanted to share not only our recommended tool for social media scheduling if you’re a small business (perfect, because it’s free and Instagram-focused), but also a step to step guide to getting this software set up, so you can launch right into it and start working straight away!
Perfect for cutting down the time you spend on social, streamlining your workflow process and making sure you stick to your strategy, this is an all round winner!
Related Posts
- How to Batch Tasks and Work Smarter
- Get Organised: How to Structure, Save & Store Your Social Media Content
- Why You Should Use a Social Media Scheduler
This page contains affiliate links meaning Social Puffin may receive a small commission on any purchases at no extra cost to you.
#1 What is Later and Why Use It?
Later is a piece of social media scheduling software.
It essentially helps you schedule all your social media content ahead of time, so that it is automatically published at a date in the future you can specify, across a range of platforms.
This can be a great way to save time when it comes to social media work, as you are essentially bulk uploading and batching your post creation ahead of time.
There are many scheduler services out there, but we like Later for its easy-to-use interface, its focus on Instagram and its excellent free plan!
Yes, the free plan on Later allows you to schedule up to 30 posts per month across 3 social media platforms you select for use.
There are a few steps to setting up your Later account however, so here, to make life easy for you, we’ve outlined the process, step-by-step, as well as our top tips for getting started using the software.
#2 Creating a Later Account

The first step to setting up Later is to create an account, which is both free and simple to do.
Before you do take this step however, please ensure your Instagram and Facebook business pages / profiles are linked to one another.
You can do this by going to your Facebook business page on a desktop device and hitting Settings in the top right.
Scroll down to the Instagram option in the tab on the left of the page and click on it.
Follow the prompts to connect your business Instagram profile with your Facebook business page.
You can also connect your Instagram business profile and Facebook business page through Business Suite.
Learn more about this great free tool you should be using already here!
Once your Facebook business page and Instagram business profile are set up, the next step is to head to Later at https://later.com/ on a desktop device.
Once there, hit the button to “Create an Account” in the top right.
In this new window, enter your name, email address and password in the specified fields and select your timezone, then hit “Create Account”.
You have now set up and entered your free Later account.
A side note here is that on free Later plans, you can only have 1 user login.
However you can have multiple devices logged into that user account at the same time.
#3 Connecting Your Social Media Profiles
Once you have created a Later account, the next step is to then connect your social media profiles to your account.
We will detail how to do this for Instagram here, as this is the most popular platform among our small business audience.
Should you also wish to connect Facebook, Twitter or Pinterest, you’ll want to follow a similar process.
A reminder that, on the free Later plan, you can only connect 3 out of 4 of these options.
To connect Your Instagram account, you’ll want to be logged into Later and then hit the “Settings” button in the bottom left corner – it has a cog icon.
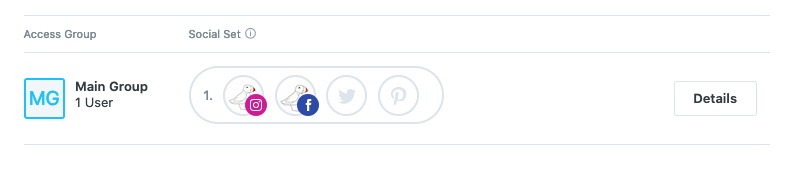
From there, head to the “Social Sets and Access Groups” option in the left hand menu, followed by “Details” on the right of the “Main Group” section.
Once here, tap the blue “Add Social Profile” button and, in the upper right, and click on the circular Instagram icon and hit “Add Social Profile”.
From here, you will then be taken through to Instagram, where you can login to your account in the usual way.
Hit “Allow” if you are shown an Authorisation Request screen and you should then be automatically returned to Later, where you can see your Instagram icon illuminated under the header “Social Sets”.
Under the heading “Social Set 1” you should also see your Instagram icon with the “Status” connected.
This means you have successfully managed to connect your Instagram profile to your Later account so that this software can now publish content to that platform on your behalf.
Repeat this process with Facebook and any other social media platforms you want connected to Later.
PS. If your social media platforms ever become disconnected (this can sometimes happen with Later), you can reconnect them by clicking the ‘Refresh’ button you can now see.
This should get them working again through Later.
You can also remove any connected social profiles here so that they are no longer synced with Later.
#4 Enabling Auto-Publish Feature
Auto publishing is a feature that Later uses to automatically send out your Instagram posts.
If this is not set up, you need to verify each post at the time it is scheduled to go out, via your Later mobile app.
This can be a hassle and can mean some of your posts do not get published if you are away from your phone.
As such, the auto-publishing feature on Later is very useful and we recommend you set this up asap.
To do this, you’ll need to download the Later app for mobile and sign into it on your smartphone.
Then you’ll want to return to Later on Desktop and navigate to “Settings” > “Devices and Notifications”.
Within this section, you should see your mobile device listed under the “Manage Connected Devices” option.
Follow the process outlined by Later here to get a notification sent to your mobile and continue the guided steps through your smartphone.
You should now have auto-publish set up so that your Instagram posts scheduled in Later can be automatically sent out to the platform (via the app) without you having to lift a finger!
It is worth noting here however, that you only need to set up auto-publishing for scheduling Instagram posts through Later. This is because scheduled content for Facebook, Twitter or Pinterest can be published automatically without needing this feature enabled.
The auto-publishing feature is also only available to Instagram business profiles and only works for Single Image Posts or Video Posts being scheduled to your Instagram Feed / Grid.
To schedule Carousel Posts, you will still need to use notifications.
To schedule Stories, your best bet will be to upgrade to a paid Later account which has this facility.
#5 Scheduling Posts
Once you’re all set up with Later – your social media profiles connected and auto-publish is enabled – it’s time to schedule some content!
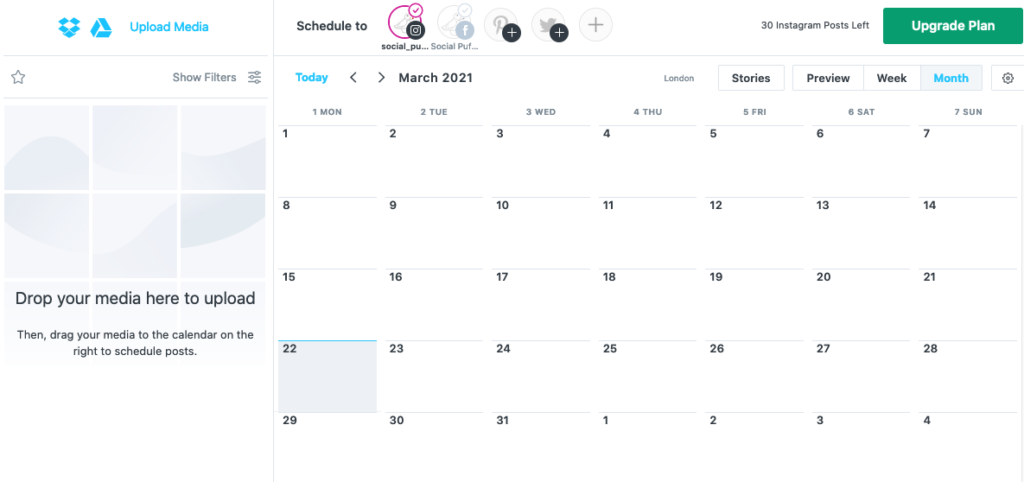
To do this, you’ll want to navigate to “Calendar” within the main Later menu and then click the Instagram icon above the grid (or whichever platform you want to schedule to).
We also advise moving to a month calendar view here, so you can see all the scheduled content for the coming weeks – this can be done using the buttons that are situated just above the grid on the right.
Once you have this, hit “Upload Media” and select the images you want to upload from the monthly content folder where you’ve saved all content images to.
Once all the images have been uploaded to Later, you simple drag and drop each photo into the relevant date and time slot within the calendar grid – you can use your social media script to prepare these dates and times in advance, so life is even simpler at this stage.
If you have a social media script in place as we advise then, at this point, you can also copy any caption or hashtags from that and drop them straight into the textbox on Later, which will appear when you drag an image into the calendar view.
With Instagram scheduled content, you’ll also want to select a Location at this point, before amending the clock to represent the date and time you want each particular piece content to be published.
Then simple hit Auto-Publish and you’re good to go!
If you’re then duplicating content across to Facebook or Twitter, you simply need to repeat the process by selecting the relevant social icon above the grid and using the already uploaded images.
Don’t forget to separate any hashtags from the main caption body within the Later textbox, with a line or set of dots.
You’ll also want to watch your character count on Twitter too.
And there you have it, our step by step guide to setting up and scheduling content with Later!
Hope this guide was helpful, but if you still have any questions, don’t hesitate to get in touch – [email protected]