It’s finally here!
The much-talked about Instagram Reels – essentially the platform’s answer to TikTok – has finally graced our updates in the UK and here at Social Puffin we couldn’t be more excited!
After waiting for this development for quite some time, we couldn’t wait to hop into this new feature and start playing around to discover all the fresh and exciting ways it allows us to create content.
And after a few weeks of doing just that, we’re delighted to now bring you our super easy guide on how to create your first Instagram Reel!
Let’s get stuck in!
Related Posts
- 5 Reasons Your Business Needs to Start Using Instagram Reels
- How (And Why) You Should be Using a Bio Link Tool
- How to Best Read and Use Your Instagram Analytics
This page contains affiliate links meaning Social Puffin may receive a small commission on any purchases at no extra cost to you.
What is Instagram Reels?
But maybe we first need to quickly fill in a bit of background info before we get ahead of ourselves, because yes, we’ve got the tendency to do that, what with the excitement and all!
So backing up a little, maybe a few words about what Instagram Reels is exactly, might prove helpful!
Instagram Reels is a new feature on the Instagram platform, which is dedicated to 15 second short vertical video content.
Similar to TikTok, videos on Reels are set to pre-recorded audio you can choose from Instagram’s extensive library.
The tone of Reels tends to be light-hearted, inspiring, engaging, fun and humorous.
Popular content includes fashion trends, dance moves, inspirational landscapes, beauty tutorials, cute animals and photography tips and tricks!
Although this could just be our feed, because the Reels you will see on your feed will be tailored to the sort of content you already consume on Instagram, as well as your geographical location and who you already follow on the platform.
Reels can be found through the new Reels Explore tab, which is located under the magnifying glass icon within your Instagram app.
Here you are given the chance to view content from creators you don’t necessarily already follow on the platform.
Otherwise, you may see Reel content popping up in your regular Instagram feed, or you can head to the profile page of any creators you already follow and tap their Reels tab, which will now be located next to their feed and IGTV tabs above their Instagram profile gallery.
What’s the Idea Behind Reels?
It’s pretty much universally acknowledged that the idea behind Reels is so Instagram can compete with the hugely popular social media platform TikTok – which is similarly dedicated to uplifting and amusing short-form vertical video content.
With potential access changes in the US (and already in India) to TikTok, Instagram has jumped in perfectly to fill the possible gap in these markets.
Reels is all about quick and easy to consume video, set to audio, that is both inspirational, educational and entertaining.
Following similar social media trends of late, Reels follows a format that is less polished and curated than the Instagram feed and more light-hearted, snappy and jovial than IGTV.
Like Stories and IGTV, Reels is adapted for the vertical format, which therefore makes it quick and easy to re-purpose existing content you may have to this new feature – a win for those of us with numerous platforms to maintain and an ever-decreasing time period in which to do this!
Like TikTok, Reels also makes it easy for users not already following you to see your content, care of the Explore feed that works much like TikTok’s ForYou page.
This means, in theory, Reels is a great way to get new followers, fans, exposure and engagement, as you showcase a bit more of the personal behind your brand.
Creating Your First Reel Step #1
And with that out the way, it’s now time to jump into the why and wherefores of how exactly how you create Instagram Reels.
Unlike IGTV, which makes use of the separate IGTV app in its creation process, Instagram Reels (like Instagram Stories) are created and published right within the main Instagram app.
Hoorah, one less thing to worry about!
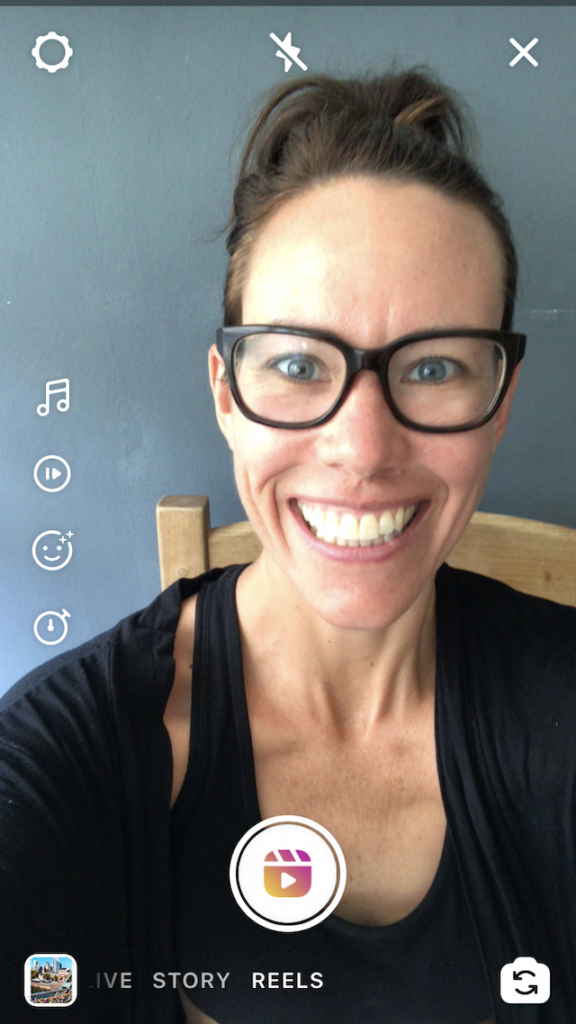
Essentially, all you have to do to find this new section of Instagram is head to the camera icon in the top left of the screen when you’re situated on your IG homefeed.
Clue: It’s exactly the same place you’d head to make an Instagram Story!
From here, you’ll need to scroll along the bottom menu between Live, Story and Reels to enter the correct mode.
Once in the correct mode, you’ll see a menu of editing options down the left-hand side, as well as a record button, which is situated in the central bottom of the screen, and your camera roll options, which are slightly to the left of this. There’s also a flip camera icon to the right.
Step #2: Select Audio, Speed & Effects
With Reels you can essentially record your video clips (up to 15 secs) live or you can select pre-recorded videos from your camera roll.
Your 15 seconds can be comprised of 1 take, or it can be comprised of several different takes that are stitched together – takes that can either be filmed live, taken from your phone’s camera roll or both.
Before you start selecting or filming footage to include however, you first need to choose your audio.
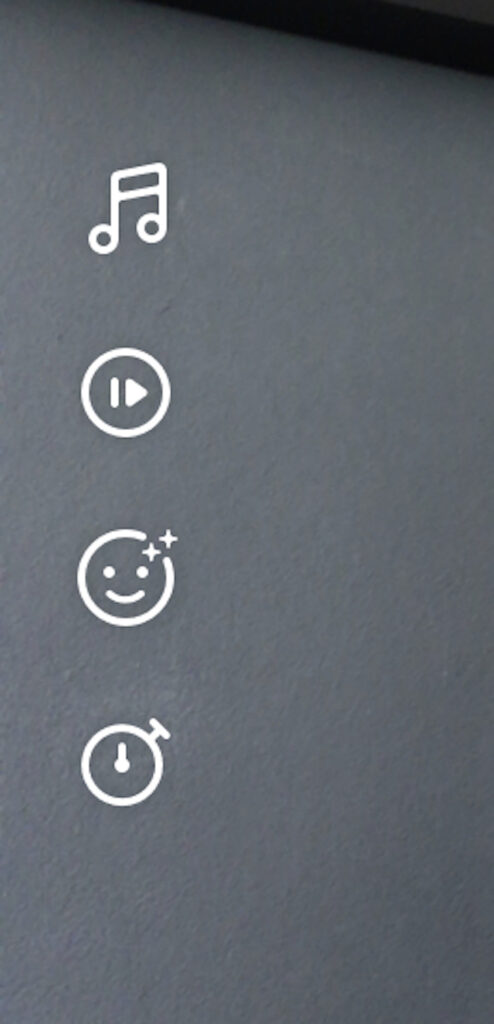
This is done by tapping the musical note icon at the top of the left hand menu.
This will bring you up a list of suggested songs, or you can browse or search specific tracks by genre, mood, artist etc.
Next, you” want to choose the speed of your video or clip by hitting the play icon and selecting whether you want to record in slow or fast motion.
And finally you can add any effects by tapping the face icon – third down on the left hand menu.
Instagram gives you a whole load of pre-loaded effects to add here, which you can access by scrolling across left and right.
You can also tap the down arrow on any effect ad then select the 3 dot icon titled more to browse even more effects and add them to your Reel or save and send them via Instagram.
To start recording while using a particular effect, simply hold down the effect button and recording mode will begin.
Step #3: Setting the Timer & Recording
With audio, speed and effects selected, it’s now time to record your video.
If you’re looking to record a 1 take Reel, simply press the shutter board icon in the centre bottom of the screen and start recording.
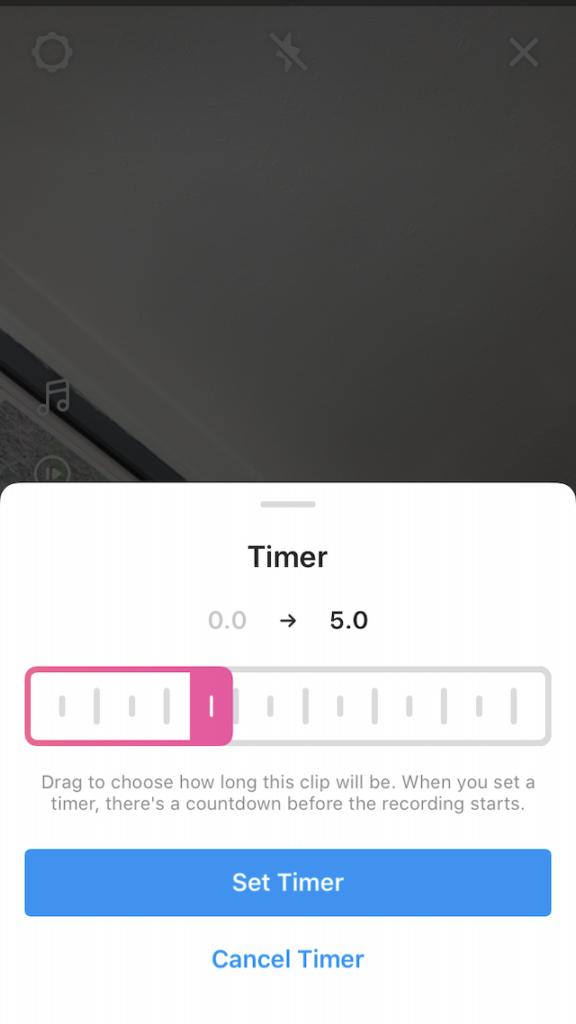
Otherwise you can also use the timer to record hands-free footage.
To do this, tap the timer icon in the left hand menu, set the length of clip you want to record, then wait for the countdown and start filming.
Using the timer to create footage of shorter than 15 seconds allows you to film multiple clips which can be stitched together.
Or you can select some clips from your existing camera roll to insert as well.
When shooting more than one clip for your Reel, you’ll also get an align option, which will appear in the bottom left hand corner.
This will help you align up your subsequent clips with those already filmed – great for outfit changes, snappy cuts or other visual effects!
To add pre-recorded footage in as one of your clips, simply tap the camera roll button in the bottom right of the screen, which will bring up your existing videos.
Just remember each time you record a clip or select one from your camera roll, you’ll need to re-programme the audio, speed and effect icons on the left hand side menu.
Step #4: Reviewing Video

Once you’ve added all your clips together, it’s then time to review your Reel, as a whole, to the audio you’ve selected.
To do this, simply hit the arrow in the bottom right of the screen and you’ll be taken through to the review section.
Here you can add further details which you’ll recognise from Instagram Stories, including text, drawing and stickers!
Like on TikTok, text can selected to appear and disappear within different sections of your 15 second Reel video.
Once you’re happy with how your video looks, you can tap right on the arrow again and you’ll be taken through to the final stage in creating your first Instagram Reel.
Step #5: Adding Caption, Hashtags & Comments
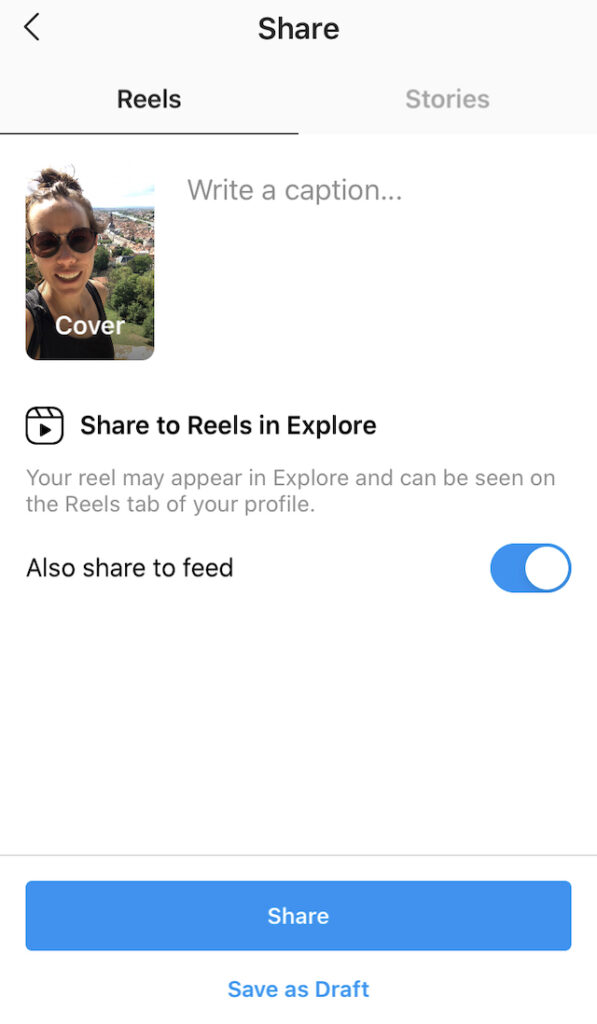
Step 5 in the process of creating Reels is all about getting ready to publish your content.
What’s crucial here is writing a short, catchy caption for your Reel.
As with TikTok, we recommend making this punchy and attention-grabbing.
The use of emojis in captions, as well as those that ask your audience questions, can be great at engendering responses here.
You’ll also want to include up to 5 hashtags in the your caption.
Finally, you’ll want to choose a Cover for your Reel.
Either you can do this by using the slider to select an image from a clip that’s already part of your Reel, or you can add an image from your Camera Roll, by tapping the relevant prompt.
One of the things we like most about Reels, especially compared to TikTok, is the captions can be altered after publication!
To do this simply, head to your published Reel, tap the 3 dots at the bottom and hit the edit button.
Step #6: Publishing

And that’s it!
Now you’re all set to publish your first Instagram Reel!
First of all choose whether you want your 15 sec video to display as a Reel or a Story.
Selecting Stories here will add your content to your Instagram Stories, where it will remain for 24 hours as usual and can then be added to your Highlights.
Otherwise, stick with publishing your Reels to this new Instagram feature, which will mean your post is automatically showed on the new Reels Explore tab – just what you want!
Publishing your first Reel in this way will then automatically create a Reel section on your Instagram profile page next to your grid and IGTV categories.
You can also select whether your Reel is shared to your feed i.e. your Instagram grid.
Your Instagram Reel can be taken down from your feed (or added to it) at any time, by selecting the relevant option after publication.
Yes one of the things we like most about Reels compared to TikTok is the level of edits you are able to make after publication!
Round-Up
So that’s it, our step by step guide on how to create your first Instagram Reel.
We hope you found it useful.
And don’t forget, if you have any questions about the process or how to use Reels, hit us up in the comments box below…