You’ve heard us mention it in a few articles we’ve written now.
And in all of them we’ve probably heaped a large amount of praise on Canva!
Which is why we thought it was about time that we actually talked about this amazing resource and let you know exactly how and why we love this online design platform so much!
Because Canva really is epic!
In fact, we’d be lost without out it and we think that, after reading this article and giving it a go, you might never look back either!
So here’s exactly how we use Canva to create our amazing social media visuals and why we never need to worry, use (or pay for) anything else!
Related Posts
- Top 7 Beginner Tips for Successful Social Media Ads
- 5 Reasons Grow is Our Preferred Social Sharing Plugin
- How to Increase Your Pinterest Performance This Year
This page contains affiliate links meaning Social Puffin may receive a small commission on any purchases at no extra cost to you.
What is Canva?

So the first basic and most important info to discuss is What is Canva?
Put simply Canva is an online design tool that can help non-graphic designers create social media images, presentations, infographics, invitations, business cards, brochures, posters and more.
It’s basically a one-stop design shop, that’s incredibly simple even for non-designers to use.
Yup, one of the best things about Canva is that it’s really easy to use, with hundreds of drop and drag elements that you can load into pre-designed image dimensions that are configured specifically for various social media platforms.
These drop and drag design elements include images, graphics, text, music, backgrounds, icons, charts and grids.
This makes Canva highly accessible, even if you have no graphic design experience, or even an artistic eye!
Hoorah we say!
This is especially true given Canva’s large range of fully designed templates that not only incorporate specific image dimensions, but also fully designed graphics you can use in their entirety or amend to suit your own needs.
But Canva doesn’t stop there.
If all this platform offered was pre-designed templates, then Canva wouldn’t be nearly half as good as it really is!
And that’s because this platform also allows you, the designer or marketer or business owner, a huge degree of flexibility.
If you don’t want to use any of their set image dimensions, you can easily create a graphic with your own custom dimensions.
If you don’t want to use any of their images or icons, you can upload your own… and with Canva Pro you can upload or choose from an even greater range including fonts, logo and stock photos.
Free and Paid Versions
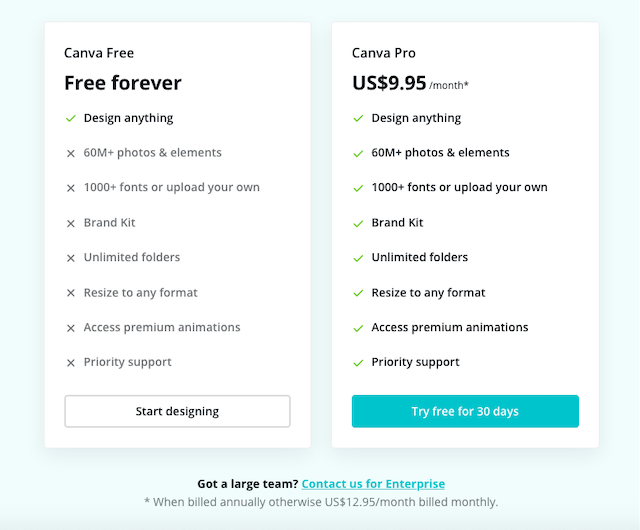
The mention of Canva Pro here leads us nicely onto talking about the price of this platform because, as if Canva wasn’t good enough already, the even better news is that you can use this platform for free!
Yup that’s right, Canva needn’t cost you a penny to utilise.
Entirely adequate for most basic websites, blogs, social media accounts and small businesses, the free version of Canva gives you access to a huge range of elements, templates and design.
All you should need in fact.
Until you get big that is and want either to organise and categorise your designs better, or get access to more of their images and icons or utilise a greater range of fonts.
At this point, you may wish to sign up for Canva Pro – the premium level service which gives you access to all the above added tools I mentioned and more.
There’s 2 tiers of paid Canva membership, both of which are billed monthly.
Canva Pro is probably the version you’re most likely to proceed with (it’s the one that us pufflings use in our own online businesses) and the costs for this is under $10 USD per month when billed annually.
In our eyes, this makes it an absolute bargain, because we literally use Canva every day!
Above Pro, there’s also an Canva Enterprise paid plan which is designed for larger teams / businesses and costs $30 USD per month when billed annually.
Both of these plans come with a free 30 day trial, so you can sign up and try them before you have to pay anything.
Personally, we suggest using the free version first to get used to Canva and then, when you realise how awesome it is (as you likely will), you dive into the paid option that suits you best.
To learn more about all these options, click HERE.
Setting Up Your Canva Account
So no matter whether you’re using the free version or one of the paid Canva plans, the first thing you need to do when it comes to creating amazing visuals using this platform is to sign up.
This is a 5 minute job, and done very easily.
All you do is head to the Canva website and create a login with an email and password.
You will then be asked to verify the email address given and once sorted, you’re all good to go!
Creating an account and logging into Canva each time is really handy and we definitely advise it, not least because you can store, edit, amend and copy all your previous designs this way.
Yes Canva basically keeps a pool of all the designs you’ve ever saved under your account and, being able to access them forever, is a great way to save time, by duplicating or tweaking designs for social media that have proved to work well for your business in the past.
Signing in also gives you access to create folders of your designs so you can find catalogue, store, sort and retrieve them with even greater ease.
Up to 2 folders are allowed on the free Canva plan (more on the Paid plans) and we highly recommend taking time to correctly file each design you create so it is easy to access again in the future.
Having an established Canva account allows you to access the Canva Teams features too, which enables you to share your designs with other colleagues, stakeholders or project members.
This is an excellent tool for small businesses, as images can be sent between Canva users in the design process (for feedback) or when finished (for direct use) and you can select whether other members are allowed to view, or edit, your work too.
So simple, yet so useful!
Ready-Made Social Media Image Dimensions
So after you’ve created an account, set up some folders and linked your team members, it’s time to start designing some awesome social media images with Canva.
We’ve chosen to show how Canva can be used to create punchy, inspiring, impactful and beautiful social media visuals in this article, because that’s what we think most of you want to know about, but it’s also worth noting that Canva can really be used for much more.
As we’ve discussed, it’s a one stop-design shop, so you can also use it to create templates for your email newsletter, an eBook you’re writing or even a flyer for an event you’re holding too.
And designing these sorts of visuals works in exactly the same way as if you were designing a social media graphic, so let’s get stuck into the process.
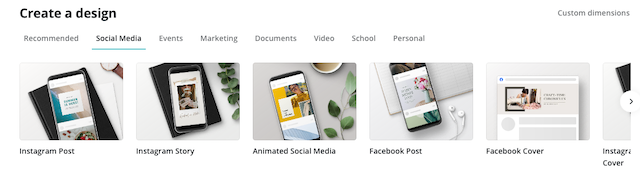
The first step when working with Canva is to select your design dimension.
You do this by logging into the website and, on the home screen, selecting which social media platform you want your image for.
If it’s Instagram, you hit the Instagram Post button.
If it’s Pinterest, you hit the Pinterest Post button… and so on.
This will give you the optimal set dimensions for an image on this particular social media network.
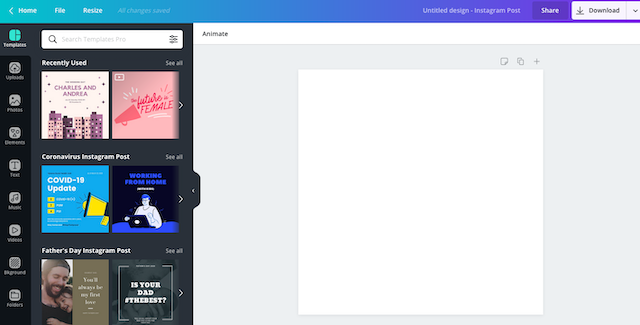
Templates for Social Media Images
Once selected, Canva will then present you with a range of pre-designed templates for that image dimension you can use, copy or amend as you wish.
You can use as many of their designs as you like, copyright-free, just bearing in mind not all are available to unpaid users (although many are).
If you’d like to design your own graphic or amend any of Canva’s templates with your own input, then you can browse their range of copyright-free photos, text, music, videos and backgrounds, which are all found in the left hand column of the page.
Videos work especially well when it comes to Video Pins (a new feature on Pinterest) and music can be used well both for Instagram and Facebook posts or Stories.
Also found here is an option called Elements, which you can use to add further details to your graphic including grids, lines, icons, charts etc.
To get even more flexibility, you can also upload your own photos, images and videos using the Upload button, and incorporating your own creativity and customising it with Canva is one of the things we like best about the platform.
With Canva Pro, this repertoire of design elements and uploads expands, so that you can even use your own fonts and logos etc to ensure your images and graphics remain fully on-brand.
Furthermore, Canva Pro also gives you a far greater range of stock photos, icons and design elements to choose from too, as well as way more designer templates so you can always keep your social media feed looking fresh with little to no extra effort.
One of the key ways we use Canva Pro, is to create quick and easy inspirational business quotes as part of our Monday motivation series. Learn more in this post.
Editing Images on Canva
Editing on Canva is super simple.
Once you have your dimensions and have selected your template and / or design elements, you simply then drop them into the blank image space.
Canva works by layering, so each new element you drop into the blank image dimension will simply layer up on top of what’s there before.
You can also add notes to your design, copy and paste styles, as well play with any element’s size, colour, shape, alignment and more.
This is all done via the top menu bar within your chosen design edit.
Any edits can be undone with the handy back button, or you can create a duplicate image and then amend it to compare and contrast.
You can also zoom in and out on your design via the percentage button in the bottom right of the screen, which allows you to view your image in detail or from a distance.
There’s a handy fullscreen mode too.
Another thing we love about Canva is that it saves in real-time, which means any changes you make are promptly stored.
Exit Canva by accident therefore and you can rest assured your last design is still saved within your account under the All Your Designs section on your homepage.
You can also use teams to share images that can be edited with other team members, via the Share button, until everyone is happy with the look and design and then you’re ready to publish.
Finishing Your Image
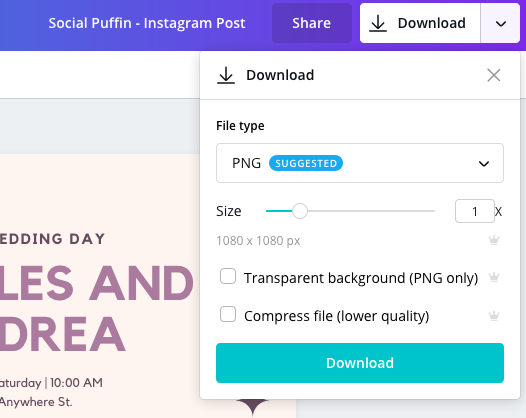
Once your visual is complete and you are ready to publish it, you can then go ahead and download the graphic in a range of formats that best suit your needs, including png, jpg and PDF.
You can also connect your social media accounts to share the image directly without having to download anything at all – great if you’re on the move.
Finally, you can also store your completed image in a correctly labelled folder, which makes it very easy to find and possibly copy, edit or amend again at a later date.
Canva Pro gives you a far greater number of folders, which is another reason we love the paid edition of Canva.
Plus, Canva Pro also allows you access to a Magic Resize feature, which means you can then amend your design to fit any dimension, easily converting an Instagram post into, say, a Pinterest Post or visa versa.
PIN IT TO PINTEREST!

So that’s our quick round-up of how we use Canva to create amazing social media visuals here at Social Puffin.
Hoping you found this post useful and it’s inspired you to delve into this great tool too.
Any questions about using Canva?
Please drop them into the comments box below…